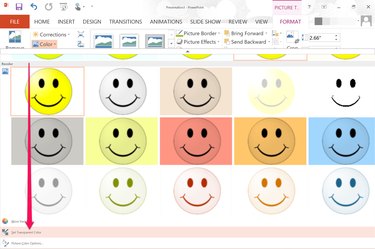
If you're inserting an image in a PowerPoint slide, keep in mind that PowerPoint 2013 supports images with transparent backgrounds, like those in some PNG files. If your favorite image doesn't have a transparent background, you can make its white pixels see-through after you've added it to your slide.
Step 1

Open a PowerPoint presentation. Go to the slide where you want to add a picture.
Video of the Day
Step 2

Change the slide's background color. One way to do this is to select a theme, available under the "Design" tab. Themes change the background color as well as the fonts and layout of the slide. To change only the background color without changing anything else, right-click on the slide's background and select "Format Background" and then click the "Color" menu.
Step 3

Click the "Insert" menu and select "Picture" to add an image with a white background from your computer to the slide. If you're looking for Office.com Clipart, select "Online" pictures instead.
Step 4

Select the picture on the slide that you want to have a transparent background. Click the "Format" menu located under Picture Tools and then click the "Color" option located in the Adjust group.
Step 5

Scroll all the way to the bottom of the available color options. Click the "Set Transparent Color" link. When the Color window closes, double-click any white area in the picture. All of the white is removed, making the white background transparent.
Step 6

Drag the picture to where you want it to appear. Resize the image as needed by dragging any of the small square "Anchors" on its border.
Video of the Day