As the adage goes, an ounce of prevention is better than a pound of cure. You can't beat good lighting and a mattifying powder for preventing face shine in photographs, but great pictures can happen unexpectedly in less than optimal conditions. Using the Brush Tool, the Clone Stamp Tool or Frequency Separation to remove face shine in Photoshop CC are tried and tested methods for achieving great results.
Removing Face Shine Using the Brush Tool
Video of the Day
Using the Brush tool to "airbrush" face shine probably comes to mind first when you think of retouching skin in Photoshop. It's a relatively simple technique, but it requires a little vision and practice.
Video of the Day
Here is an image with a little too much face shine:

Step 1
Open your image in Photoshop.
Step 2
Create a new layer by clicking the Create a New Layer icon in the Layers panel.
Step 3
Select the Brush tool -- keyboard shortcut B -- and then select Window and Brush -- keyboard shortcut F5 -- from the main menu to open the Brush panel.
Step 4
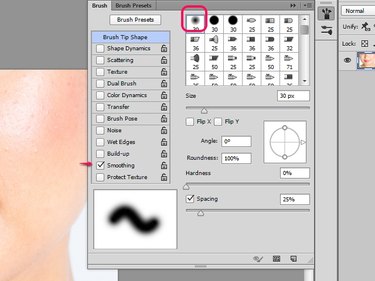
Choose Smoothing and a Soft Round Brush from the Brush panel. Close the panel.
Step 5
Set Opacity and Flow. Setting the opacity at 20% - 40% and the flow around 50% is a good starting place. You will likely need to adjust this throughout the editing process.
Step 6
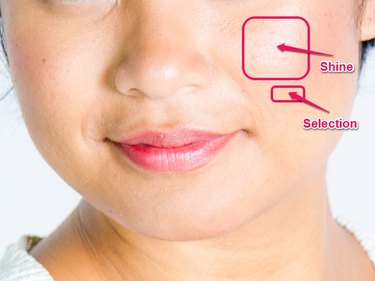
With the Brush tool selected, hold the Alt key and left-click on an area of the picture near the shiny area you want to correct. Choose a non-shiny area where the skin tone looks the way you want.
Step 7
Paint with the brush on the area you want to correct. Re-select skin tone as you move to a new area of shine. Adjust the size of the brush, Opacity and Flow as necessary.
Step 8
When you are happy with the results, select Layer and then Merge Visible to merge the layers. Select the Spot Healing Brush Tool -- keyboard shortcut J -- and carefully remove any distracting imperfections. Size your brush a little larger than the spot you want to heal and select Content-Aware as the Type. Left-click the spot to heal it. Repeat as necessary.
Here is the end result using the Brush tool.

Removing Face Shine Using the Clone Stamp Tool
Using the Clone Stamp tool to eliminate face shine works in a similar way in terms of selecting target areas and painting. The main advantage to the clone stamp method is that it clones texture as well as color and in certain situations provides a more natural looking end result.
Step 1
Open the image in Photoshop, create a new layer and select the Clone Stamp tool -- keyboard shortcut S.
Step 2
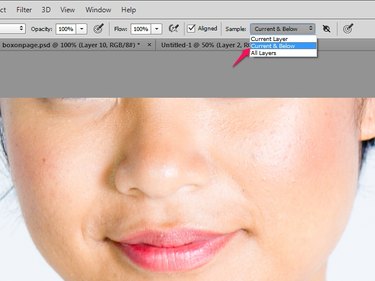
Change the Sample selection to Current & Below.
Step 3
With your Clone Stamp Tool selected, hold the Alt key and left-click on an area of the picture near the shiny area you want to correct -- where the skin tone looks the way you want it.
Step 4
When you are happy with the results, select Layer and then Merge Visible to merge the layers. Use the Spot Healing Brush tool to clean up any distracting imperfections.
End result using the Clone Stamp tool.

Removing Face Shine Using Frequency Separation
Think of low frequency as the color and tone in your photograph and high frequency as the detail -- skin texture, pores and blemishes. Using this method, you edit the shine using the low frequency information while leaving the texture of the skin intact. This allows for a comprehensive retouch without losing detail.
Step 1
Open the image in Photoshop.
Step 2
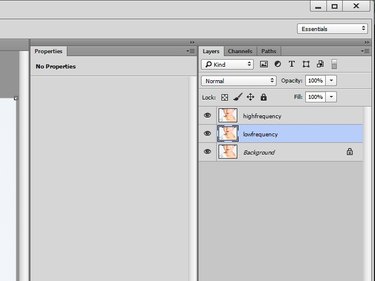
Make two copies of the layer by right-clicking on Background and selecting Duplicate Layer. Name the top layer highfrequency and the middle layer lowfrequency, -- or anything that helps you identify the layers.
Step 3
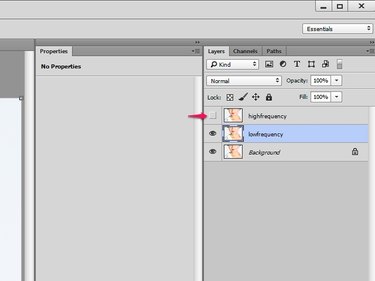
Hide the highfrequency layer by clicking on the Eye beside it in the layers panel.
Step 4
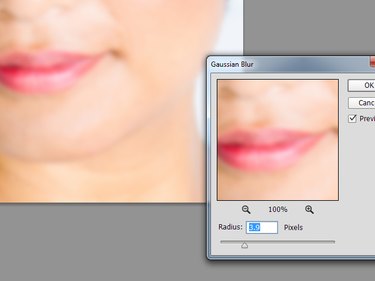
Select lowfrequency in the layers panel and then choose Filter from the main menu, Blur and Gaussian Blur. Adjust the Radius slider to eliminate the skin detail and leave only the color. Try a setting somewhere between 2 and 4 pixels. After you make the selection, turn the highfrequency layer back on by clicking the Eye again.
Step 5
With the highfrequency layer selected, go to Image and then Apply Image via the Main Menu. The settings here depend on your bit mode:
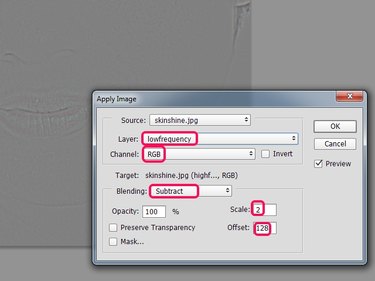
If you are working in 8-bit mode, enter the settings shown here.
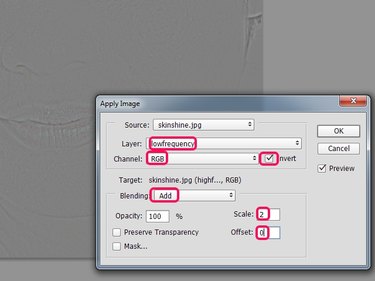
If you are working in 16-bit mode enter the settings shown here.
Step 6
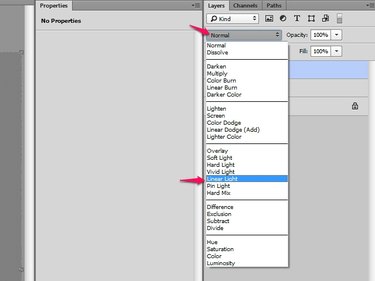
Change Blending mode in the Layers Panel to Linear Light. You'll now be able to see your photograph again.
Step 7
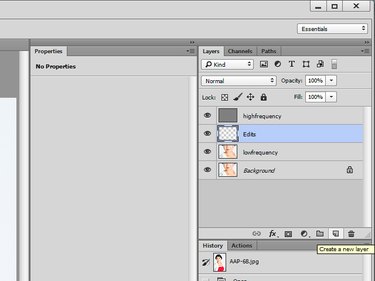
Create a blank layer between the highfrequency and lowfrequency layers -- this is your non-destructive editing layer.
Step 8
Use your preferred method to complete the retouching.
End result using Frequency Separation:
