Memory card errors are not a problem exclusive to Canon. Flash memory cards, such as SD cards which are most frequently used in Canon cameras, have a limited life span. The SD Association expects a life of 10 years under normal use, but it is possible for data corruption or other problems to occur before the card itself fails. Reformatting a flash memory card usually clears any error, when the problem is with data on the card itself.
Canon Error Codes
Video of the Day
The most common error codes accompanying flash memory card errors and the Canon-suggested solutions are:
Video of the Day
- Err 02 -- The camera can't access the memory card. Remove and re-insert the card. If this fails, format the memory card.
- Err 03 -- There are too many folders on the memory card. This may occur if you use your memory card for other purposes. Canon advises replacing the card with a properly formatted card. You can also reformat the existing card after removing any other data.
- Err 04 -- The memory card is full. Transfer or erase images not needed on the card, or, if all data is saved elsewhere, reformat the card to prepare it for additional shooting.
- Err 10 -- A data file problem has occurred. Canon suggests turning off the camera, removing the battery, re-installing it and turning the camera on again.
Basic Troubleshooting
Regardless of the error, try some simple checks before formatting and potentially losing image data. Perform each of these steps with any Canon camera model.
- Turn off the camera and remove the battery. Wait 10 to 15 seconds, replace the battery and turn the camera on.
- Turn off the camera and remove the flash memory card. Reinstall the card and turn the camera on.
- Remove and replace the lens or change to another lens. Combine this with a camera on/off cycle, as sometimes camera-to-lens communication has unexpected effects on other systems.
- Remove the flash memory card and try it in another Canon camera or in a computer card reader.
- Try another flash memory card in the camera. These last two steps may indicate a problem with the camera rather than the card.
Formatting With a Camera
Step 1
Turn on your camera and press the Menu button. On EOS DLSR models, this is on the left, above the LCD screen on most models. The location varies on PowerShot cameras.
Step 2
Use the right arrow button to the right of the LCD screen to navigate through the menus until you get to the setup screen that includes Format. Use the down arrow button to highlight and press the Set button to select.
Step 3
Select OK using the arrow buttons and press the Set button to format the memory card. Use the Delete button, with the garbage can icon, to select the Low Level Format check box. Low-level formatting erases all data, while a regular format simply changes file management information; therefore the low level option returns the card as close as possible to its factory state.
Formatting With a Computer
Step 1

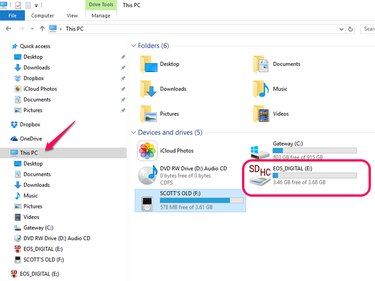
Insert the memory card into the reader slot on your computer. Open File Explorer and click This PC on the left side of the screen. Locate your memory card on the right.
Step 2

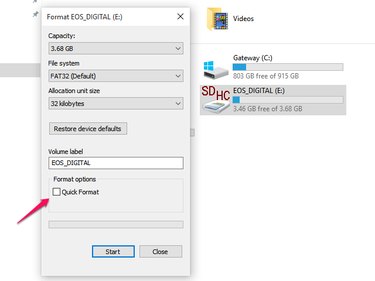
Right-click on the memory card icon and select Format from the drop-down menu. Make sure the Quick Format box is unchecked and click Start. Click OK at the warning screen, and formatting will begin. A progress bar indicates the level of completion, and a window pops up when formatting is complete. Click OK and Close.
Step 3
Load the memory card back into the camera and check for error codes. While the card may now work with Windows formatting, it's a good idea to use the camera format routine as outlined above to ensure the file structure is what the camera expects. Once that's complete, your memory card is ready to use.