While offered as freeware, Audacity has many of the capabilities of professional digital audio workstations, and over the years it has been tweaked to perform with the same polish as high-end recording software programs. Not everyone who records a song demo or a podcast has access to high-quality microphones, studio-grade preamplifiers or a seasoned recording engineer, and that's where the tools and audio effects in Audacity can help. If a vocal track you've recorded sounds thin or lacks punch, you can give it more presence in Audacity using the Equilization filter or by double tracking the recording.
Equalization
Video of the Day
Vocal presence is located in the midrange frequencies of a recording. The lower frequencies of speech for males typically range from 85 to 155 hertz. Female voices cover a higher range of frequencies from about 165 to 255 hertz. To boost the bass of a vocal recording, 150 to 600 hertz is a good frequency range to tweak. To hear the effect of using Audacity's equalizer, start by boosting the frequencies around 200 to 600 hertz to bring up the bass.
Video of the Day
Step 1

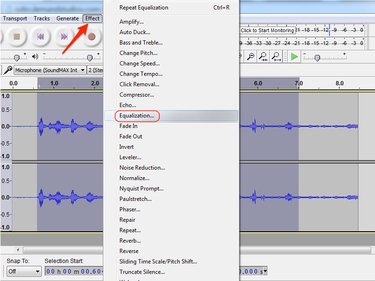
From Audacity's Effect menu, select the Equalization filter. This brings up the equalization window where you can precisely adjust individual frequencies on the recording.
Step 2

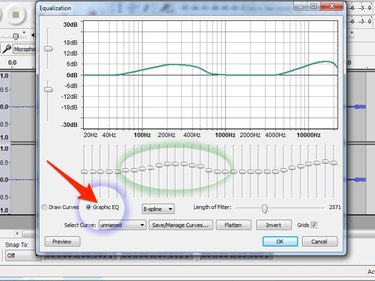
Check the Graphic EQ button to bring up the graphic equalizer window. Using the sliders, create a gently rising curve beginning at 100 hertz and ending at 600 hertz. The goal is to create a 5-decibel slope that peaks between 250 and 315 hertz. To compensate for a loss of higher frequencies, create a similar boost starting at 6 kilohertz.
After applying equalization, use the Undo and Redo features of Audacity to check the effect of the changes on the vocal track. You should hear an increased bass response, which makes the recording sound richer and fuller.
While the fundamentals of the human voice occupy a fairly narrow range, the bandwidth allocated to voice frequencies extends as high as 8 KHz. This allows a recording to pick up all the nuances of a vocal performance and the acoustic clues of room ambiance. If you feel the recording loses intelligibility or clarity as you add bass, gently adjust sliders in the 1.5 to 6 KHz range, where the important consonant sounds known as plosives appear in a recording. These accented and power sounds include the pronunciation of the letters t, b, p, s, d and k. Boosting in the 1 to 6 KHz range can add harshness to a recording, so make changes in the smallest increments you can. You can more safely restore a sense of "air" to a recording by boosting the frequencies in the 6 to 15 KHz range, which adds brightness without vocal harshness.
Double Tracking
Like equalization, doubling a vocal track can improve a lackluster recording. Double tracking is a time-honored studio technique. While some performers are able to sing an accompanying track live, while remaining perfect pitch and replicating their exact phrasing, most people can't. This is where the copy, paste and multi-tracking features of Audacity come in handy. Multi-tracking and filters for speed and pitch-adjustment, are used to create a chorus effect. If you paste a duplicated, unaltered track on top of another, all that results is an increase in volume. What makes a double tracking interesting to the ear are tiny differences that mimic the vocal variations you might hear from a chorus of singers. Use Audacity's pitch and speed adjustments to mimic those variations.
Step 1

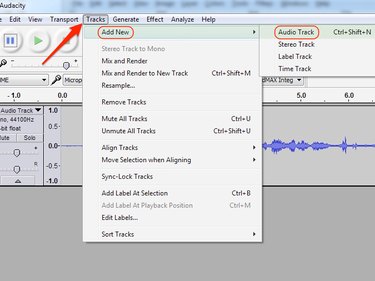
Create a second audio track from the drop-down menu in Audacity. Select Tracks, Add New and Audio Track to create a blank audio track. Select, copy and paste a copy of the original recording into the blank track. Alternately, highlight the original track and use Ctrl-Shift-M to duplicate the track.
Step 2

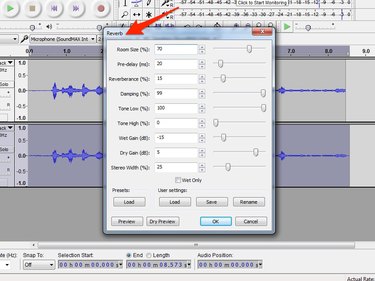
Add reverb for body. While the simulation of multi-tracking uses two identical tracks, the reverb filter makes small differences in timing and timber for an interesting effect. Open the Reverb filter using Audacity's pull-down menu Effect and then Reverb and apply the following settings to just one of your tracks:
- Room size = 70
- Pre-delay = 20
- Reverberance = 15
- Damping = 99
- Tone Low = 100
- Tone High = 0
- Wet gain = -15
- Dry gain = 5
- Stereo Width =25
When you play back both vocal tracks together, you hear increased depth and resonance in the previously tinny-sounding recording.
You can also use a chorus effect to enliven a vocal track in Audacity. A chorus filter slightly alters the pitch of a track and applies a delay for an ethereal, multi-timbre sound that is rich and intriguing sounding. Although the chorus effect is better suited for vocals on a song, you can use it to improve a narration track -- if you apply it judiciously. A number of free chorus filter plugins for Audacity are on the Web. A good place to start is with the free MultiVoiceChorus plugin available at the Audacity forum.
Step 3
When you are satisfied with the sound attained when playing the original vocal track and the modified copy together, merge them to simplify the recording process.