Mixing songs in any audio editing software is a matter of taking your ingredients -- the individual tracks of music -- and blending them in perfect proportions to end up with a tasty final project. It's not quite as easy as pie, however, since there's no master recipe to follow, and Audacity's open platform isn't meant to replace powerful commercial applications. However, it does support the ability to balance levels between tracks, and add equalization, compression and other effects commonly used in the mixing process, before finally combining all tracks into a single stereo track for exporting into a playable digital song format.
Editing
Video of the Day
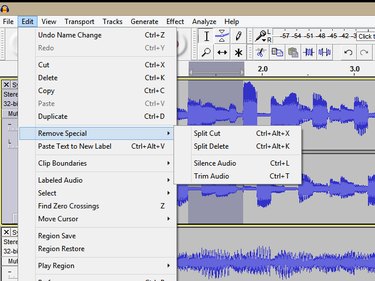
Delete or mute sections not needed in the final mix. For example, you can use Audacity's selection and editing tools to trim the start and end of files, as well as to delete quiet or unwanted sections. Background noise can add up over several tracks, so this is a good housekeeping practice to assure best quality for your project. Access Audacity's editing tools by selecting a section of audio, clicking Edit on the menu bar and selecting the appropriate edit. Clicking Remove Special accesses the most powerful editing options. These include:
Video of the Day
- Split Cut -- Also accessible using the Ctrl-Alt-X key combination, Split Cut removes the highlighted audio and places it on the clipboard. Audio on both sides of the highlighted sections remain in place. This option splits your audio track into pieces called clips.
- Split Delete -- Use Ctrl-Alt-K as a keyboard shortcut. Split Delete does the same as Split Cut, without placing the cut audio on the clipboard.
- Silence Audio -- This option replaces the selection with silence, useful for keeping your track in one continuous clip. The keyboard command for this is Ctrl-L.
- Trim Audio -- When you want to quickly remove audio before and after your selected audio, this option keeps whatever you've highlighted, deleting the rest. Ctrl-T activates the option from the keyboard.
Audio Enhancements
Equalization, compression and reverb are each used to fit parts together in a mix, either by blending, or by separating tracks within the final mix. Tuning and embellishment isn't limited to these three effects, either. Audacity includes over 40 effects for use with your tracks. Though there's no standard way to approach this stage of mixing, recording technology magazine Sound On Sound suggests a four-part sequence when approaching a mix:
- Dynamics
- Equalization
- Reverb
- Panning
Keep in mind that this order is a starting point. You don't need to use all or even any of the steps. Your ears should be the final authority.
Dynamics
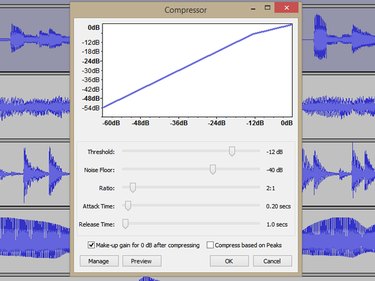
Assuming you have adjusted the volume of each track to create a rough mix, the first round of adjustments may address dynamics -- how loud or soft each track is, as well as loudness changes within it -- and smoothing out important tracks. For example, a singer may have a volume range that overwhelms the music in some places and can't be heard in others. Dynamics processors cut, boost and generally tame dynamics so that important content can be heard. In Audacity, access these effects by clicking Effects, and then selecting the desired effect from the drop-down list. Dynamics effects include:
- Compressor -- You can think of this effect as changing the proportions of loudness in a track. Instead of the loudest point being 10 times louder than a quiet point, for example, the compressor can be adjusted so that the loud part is only four times louder. This gives the effect of making both the quiet part louder, permitting a vocal, for instance, to be heard clearly through a mix.
- Limiter -- A limiter leaves quiet signals below the threshold unaffected, while cutting off, or limiting, signals above the threshold. Useful to control occasional peaks in music content, aggressive limiting may cause distortion.
- Leveler -- A simple composite effect that combines features of compression and limiting, this can also be used as a special effect.
Equalization
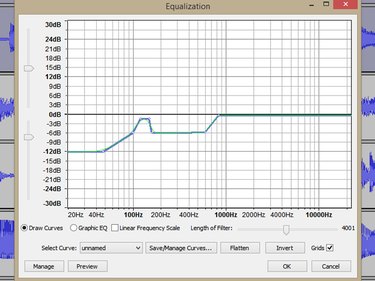
Balancing sounds across the frequency spectrum from low to high is an important part of a successful mix. In particular, midrange frequencies tend to build up, as many voices and instruments have content in this range, and without adjustment, a mix can take on a "cardboard box" sound when tracks are added. Look to Audacity's EQ effects to remove frequencies from each track that are covered by other instruments and not needed in the final mix.
- Equalization -- Audacity's workhorse EQ, this effect can be using as a graphic equalizer using sliders, or you can click and drag on the EQ graph itself. This effect works across the audio spectrum.
- High-Pass Filter -- A special equalizer that allows frequencies above an adjustable threshold to pass, while reducing those below. A singing voice usually has little content below 150 Hertz, for example, so it's common to set the High-Pass filter to remove audio below this point.
- Low-Pass Filter -- This effect works the same as the High-Pass filter, but instead allows low frequencies through.
- Notch Filter -- This is a narrow band EQ used to treat frequency-specific issues. Examples include nasal vocal sounds or electrical hum from guitar amps.
Reverb
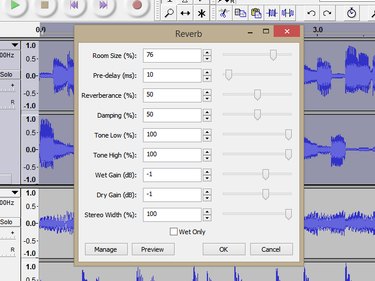
The sound of a great concert hall comes from the way sounds bounce around within it, imparting a sense of space. That's usually called reverb, a series of echoes packed closely together. Reverb effects give a sense of space to both individual tracks and complete mixes. Audacity includes several time-based effects that can give your mix a feeling of depth.
- Reverb -- This effect produces room sound. Its parameters include settings such as room size and reverberance, or approximating the sound of such a room as it would behave in a real setting.
- Echo -- A simple repeat function that probably has only special effects value for mixing.
- Delay -- This effect produces echoes, but with more control. Delays are used where applying reverb may interfere with clarity. Delay gives a sense of depth without the continuous sound of reverb.
Panning
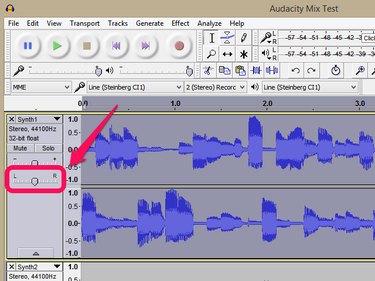
Panning takes place on each track within your Audacity mix project. By default, Audacity creates a stereo mix, which means any sound can be moved between extreme left and right, using this slider. Low frequency sounds, such as electric basses and bass drums, are usually center-panned, since low frequency information isn't very directional anyway, and lead vocals are often panned to the middle too, for prominence and clarity. You can "make room" for vocals by moving instruments with lots of middle frequencies to the left or right. It's common to place instruments from side-to-side as you would expect on a stage, but as with everything in mixing, there are no rules.
Exporting and Rendering
Once your tracks sound the way you want, you have two ways to create a copy of your mix.
- Audacity combines tracks automatically upon export. Simply click File, Export Audio, and then choose the file name, location and file format from the Save as type drop-down.
- Rendering creates a new, mixed track from your existing tracks, and there are two ways to do this. Both are available from the Tracks menu. Mix and Render creates a new mix track that replaces your original tracks, while Mix and Render to New Track does the same, but preserves your original tracks.