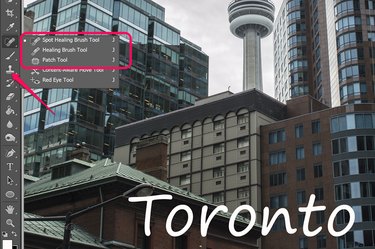
There are several ways to remove text from an image in Photoshop CC. If the text is in its own layer, as is the case with vector text created with the Text tool, you can simply delete or hide that layer. In most image formats, text is embedded into an image as pixels so you need to reconstruct the area covered by the letters using surrounding pixels. The smaller the text is, the easier it is to remove. For best results, work on one letter at a time. If you don't get the results you want the first time, try using a combination of tools to remove the text.
None of these techniques should be used on copyright notices, photo credits or watermarks. Removing such text from an image without permission is a violation of copyright law.
Video of the Day
Video of the Day
Removing Text Layers
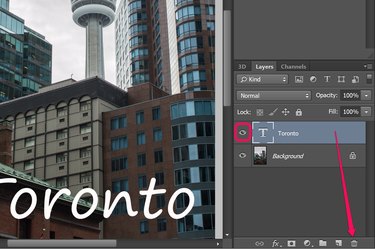
If the text in an image occupies its own layer, removing it is simply a matter of deleting that layer. This isn't possible in a single-layer image like a JPG or PNG file, but it can work in multi-layer formats, like Photoshop PSD files. Text layers always have a T-shaped icon in the Layers panel and often include the first words as the layer name. To delete the text, select the layer in the Layers panel and then click the "Delete" button at the bottom of the panel. Another option is to click the layer's "Eye" icon to make the text invisible.
Using the Healing Brush Tool

The Healing Brush Tool is usually the best option for deleting unwanted text that is embedded into a photo. Adjust the brush size in the Options bar so the tool is the same width as the text lines and then drag it across one letter at a time. If you're new to this or any other technique, consider duplicating the layer before you begin working on it. If you make a mistake, you can simply delete the copy and try again.
Photoshop uses information in the surrounding pixels to remove the text and replace it with pixels that resemble the background. The more complicated the background is, the more noticeable this touch-up will be. After removing a letter, you can use the Healing Brush Tool, or one of the other tools discussed in this article, to clean up the background.
Using the Spot Healing Brush Tool

The Spot Healing Brush Tool works similarly to the Healing Brush Tool, except that it gives you manual control over which pixels are used to replace the text. Before using this tool, you need to Alt-click a spot on the image to use as a sample. As you drag the cursor over a letter, the sample also moves as it replaces the letter. This tool works best when the text appears over a pattern or a solid color.
When replacing solid text, the Spot Healing Brush may smear the pixels with the text color. Going over the same area again two or three times usually gets rid of the smear.
Using the Patch Tool
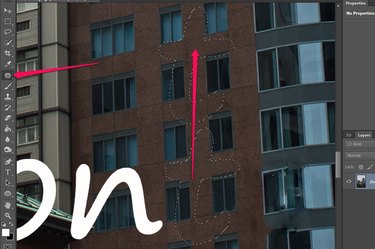
The Patch Tool is another handy way of removing text. First drag the cursor around a letter, and then drag the selection towards an area of the screen with a similar background. The entire selection is replaced with the new area you choose. The benefit of this tool is that you get to see the results in real-time as you drag the patch across the screen. The letter isn't replaced until you release the mouse button. As with the Spot Healing Brush Tool, the Patch Tool is best used when the text is over a solid color or a pattern.
Using the Clone Stamp Tool

The Clone Stamp Tool works much the same way as the Spot Healing Brush Tool. First, alt-click an area to clone and then drag the cursor over a letter. As its name implies, this tool clones the selected area and stamps it over the letter as you drag the cursor.
The Clone Stamp Tool literally stamps the selection over the letter. The benefit of this tool is that you don't get the smears that appear with the Spot Healing Brush Tool. The drawback, however, is that the repeated pattern in a photo often makes the repair easily noticeable.