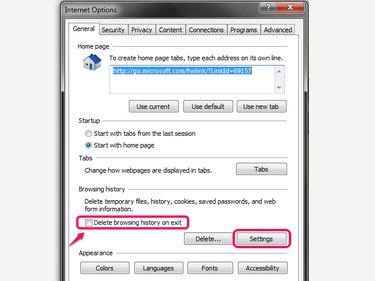
Both Internet Explorer and Firefox have settings to erase your history every time you close the browser. By disabling these options, you can keep a log of sites you visit, up to the browser's maximum history size. As of Chrome version 41, however, Chrome has no such setting built in, and removes history only on demand. If your copy of Chrome keeps erasing your history, check your extensions for the responsible add-on.
Internet Explorer
Video of the Day
Step 1
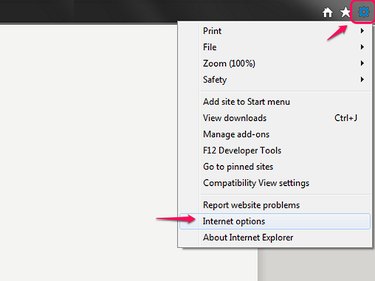
Open the Tools menu in Internet Explorer 10 or 11 and click Internet Options.
Video of the Day
Step 2
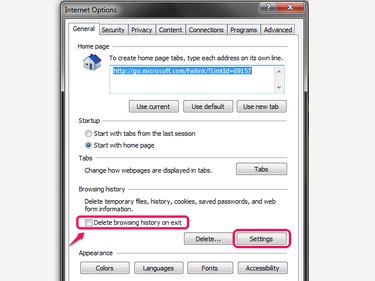
Uncheck Delete Browsing History on Exit to keep your history between browser sessions.
Press Settings to change how long IE saves your history.
Step 3
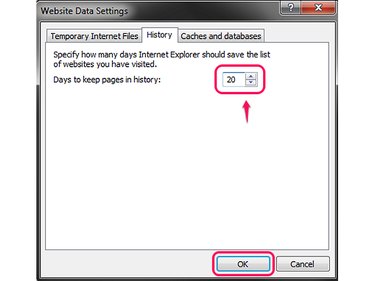
Set the number of days to keep your history, on the History tab. The number represents a rolling expiration date. For example, with a setting of 20, the browser checks every day and erases sites you haven't visited in the last 20 days.
Press OK on both open dialog boxes to finish.
Firefox
Step 1
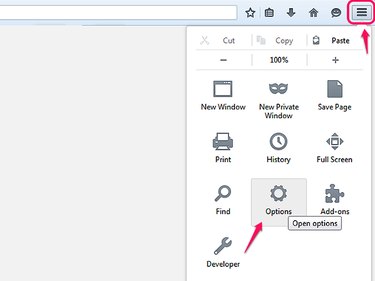
Open the menu in Firefox 29 or above and click Options.
Step 2
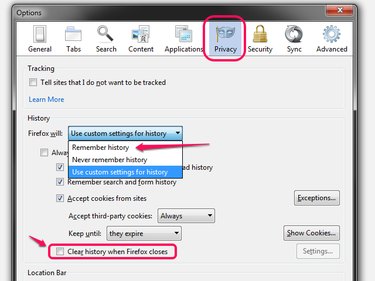
Switch to the Privacy tab and uncheck Clear History When Firefox Closes if you have your History option set to Use Custom Settings for History.
Alternatively, simply set the History option to Remember History if you don't use any custom settings.
Step 3
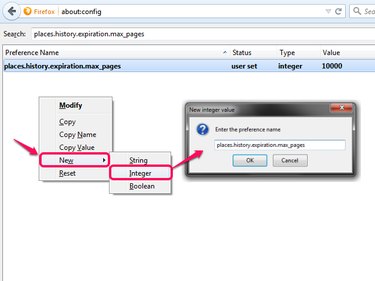
Set the maximum number of pages to retain in history using the places.history.expiration.max_pages setting on the about:config page, if you're an advanced user and comfortable editing the browser's configuration. If not, skip this step.
To change the setting, browse to about:config, right-click a blank space in the window, choose New and Integer, and then enter the name places.history.expiration.max_pages and pick a maximum number of pages to keep. With sufficiently large values, you can retain history indefinitely, but doing so can impact the browser's performance. If you're uncertain, it's best to leave this setting alone.
Chrome Extensions
Step 1
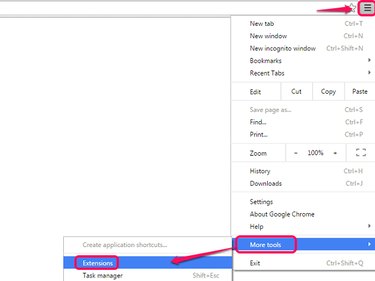
Open the menu in Chrome and click More Tools and Extensions.
Step 2
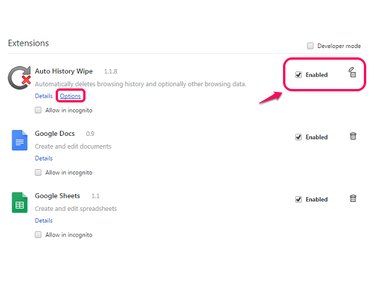
Click the trash can icon by an extension that automatically deletes your history to remove it, or uncheck Enabled to turn it off temporarily.
Some extensions offer detailed settings. Click Options by your history-removing extension, if present, to set its options.
Step 3
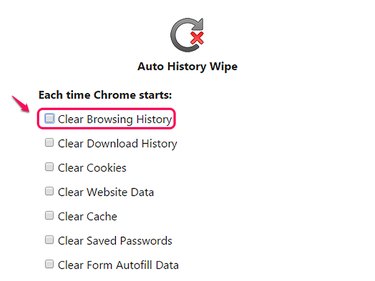
Uncheck the setting in your extension's options that automatically clears Chrome's history. Every extension works differently, so if you can't find an appropriate option, simply disable or remove the extension instead.
- Microsoft Windows: View and Delete Your Browsing History
- Mozilla Developer Network: Places Expiration
- Mozilla Support: Settings for Privacy, Browsing History and Do-not-Track
- Microsoft TechNet Magazine: Prevent Users From Deleting Browsing History and Clearing Cookies
- Google Chrome Help: Delete Your Browsing History