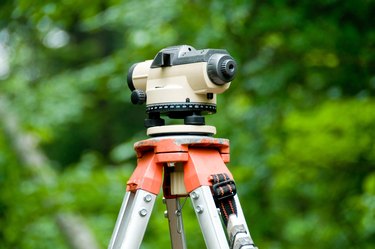
A theodolite is an instrument used commonly by builders and engineers to measure precise angles, which is necessary for large scale construction projects. A basic modern optical theodolite typically consists of a small telescope which is connected to two angle measuring mechanisms, one for measuring horizontal angles and one for measuring vertical angles. It sits atop a rotatable base with a leveling mechanism on a tripod. Once the theodolite is set up, the telescope is turned to spot the desired point and then the angle from the point that the theodolite is placed to the point spotted in its telescope can be read through the eyepiece of the scope.
Setting up the theodolite
Video of the Day
Step 1
Find a patch of firm level ground with a good view of what you wish to spot.
Video of the Day
Step 2
Extend the legs of the tripod so that the theodolite will be at a comfortable level for you to use, splay them as far as they will go (most theodolite tripods will have a mechanism that will lock them when they reach their maximum separation and extension), and stick the ends of the legs into the earth as much as you can.
Step 3
Adjust the three leveling screws on the base of the theodolite so that it is level. The spherical spirit level mounted on the theodolite will give you an idea of when it is roughly level.
Step 4
Align the long spirit level with two of the three screws and readjust with those two screws to achieve a more accurate level on that axis. Then turn the theodolite 90 degrees on its base and adjust again using the third screw.
Step 5
Release the two horizontal adjuster clamps (usually large knobs on either side of the theodolite, slightly vertically offset).
Step 6
Align the upper part of the theodolite with the mark on the ring between the two sides which are connected to the horizontal clamps, then lock the upper clamp.
Step 7
Open the mirror light source on the side of the theodolite, and look through the small eyepiece. You will see three scales: horizontal, vertical, and fine adjustment. Use the fine adjustment knob on the upper part of the theodolite to align the mark with 0'00" (0 minutes and 0 seconds of arc).
Step 8
Use the upper horizontal adjustment knob to align the single line you see in the scope on the bottom half of the horizontal scale exactly between the double lines which sit below the number 0.
Step 9
Create a reference line by lining up the theodolite horizontally with a tall landmark within easy view. Unlock the lower clamp to make this rotation, line the sight up with the landmark, and lock the lower clamp again. The horizontal measurement will still be zero. From now on, only loosen the upper clamp to make horizontal adjustments.
Taking a measurement
Step 1
Unlock the upper horizontal clamp, and rotate the theodolite until the arrow in the rough sights is lined up with the point you wish to measure, then lock the clamp. Use the upper horizontal adjuster (not the clamp) to align the object between the two vertical lights in the sight.
Step 2
Look through the small eyepiece, and using the fine adjustment knob to get a precise horizontal line up with your object. The degrees from your reference are measured on the horizontal degree scale, the minutes and seconds on the fine adjustment scale (ex. 30 degrees 10'30").
Step 3
Unlock the vertical clamp and look through the sight while moving the theodolite up and down to find the precise spot vertically on your object that you'd like to measure. Lock the clamp and use the fine vertical adjustment knob to get a precise fix on the point you've chosen. Then look through the small eyepiece and read off the degrees, minutes and seconds from the vertical scale and the fine adjustment scale as you did for the horizontal scale. If your object is up high you'll need to do a rough horizontal adjustment first, then do the vertical measurement, then readjust for the final horizontal measurement. These two coordinates give the exact angle between your reference and your point of interest, but you can also measure the angle between two points by comparing their two measurements, or by setting the first point as the reference.