Whether you need to convert the sampling rate of your WAV files to 8kHz for compatibly issues, to create WAV ringtones or you just simply enjoy working with 8-bit music, converting WAV to 8kHz is a short and simple process. With the help of some audio-editing software, you can down-convert your WAV files in no time.
Step 1
Download a copy of the audio-editing program GoldWave (see Resources). Run the installation program and then open it.
Video of the Day
Step 2
Click on the "Open" icon, located in the top-right corner of GoldWave--between the "New" and "Save" buttons.
Step 3
Use the "Open Sound" window that appears to browse your computer for the WAV file you'd like to convert to 8kHz. Select the file and then click "Open" in the bottom-right corner of the "Open Sound" window.
Step 4
Click on the "File" heading back in GoldWave's main menu--the heading will be located in the top-right corner, adjacent to the "Open" button. Choose "Save As" from the drop-down "File" menu that appears.
Step 5
Use the "Save Sound As" window that appears to choose the folder location on your computer to save the 8kHz version of your WAV file.
Step 6

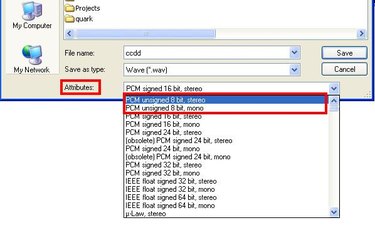
Click on the list menu adjacent to the heading "Attributes." Select either 8-bit stereo or 8-bit mono. Click the "Save" button, and your WAV file will be saved at a sampling rate of 8,000 hertz (8kHz).
Video of the Day